The trickiest part when planning your trip to the Philippines is deciding which places to visit. With more than 7,600 islands to explore, it’s normal to feel overwhelmed—we’ve all found our heads spinning more than once. While the Philippines travel itinerary you choose will largely depend on your interests and expectations, we want to make things a little easier by putting together a few sample itineraries you can tweak a bit to fit what you’re after. In this case, we’ve put together a 1-month (30-day) Philippines itinerary that will help you fall in love with this wonderful island nation just as we have—we’ve been exploring it for 15 years.
Most travelers can stay in the Philippines for up to 30 days without a visa, and we also think it’s a great length of time for a fairly relaxed trip. Remember that, as we explain in How to plan a trip to the Philippines, almost every time you move on to a new destination in the country, you lose the best part of a day to travel. If you have a full month for your trip to the Philippines, you’ll be much less likely to feel as though you’re spending your entire trip on buses, planes, boats and tricycles…
18-day trip around the Philippines
Key features of this 30-day Philippines itinerary
This 1-month Philippines itinerary will take you to some of the best islands in the Philippines and several of the best beaches in the Philippines. Here are the key features of this 30-day Philippines route, so you can understand how and why we designed it this way and keep them in mind when making any changes:
- Arrival and departure days: this is a 30-day Philippines itinerary in which we assume you’ll have enough time on the first day to travel to Siargao and enough time on the final day to catch your outbound flight from Manila. You’ll need to line up your international flights carefully.
- Final destination: you could end in Coron, but we don’t recommend doing so, because it’s a small airport and flights are often delayed or canceled. That’s why we leave Puerto Princesa for the end (a large, well-equipped airport), which means you can leave a shorter buffer before your international flight. That said, if you can return to Manila or Cebu the day before that flight home, even better. Otherwise, leave at least 6 hours between the two flights.
- Best time for a 1-month Philippines route: the best season for much of the country runs from November to May, but this is also a good itinerary if you plan to travel to the Philippines in August or in other months such as July or September, since, as we explain in Best time to travel to the Philippines, it’s the dry season in Camiguin and Siargao.
- Intensity: this is a moderately paced trip. In practice, that means you’ll have plenty of time to enjoy each destination. If you want to do a bit more, we’ll share some alternatives at the end.
- Who it’s for: this is a well-rounded itinerary suitable for all kinds of travelers because, besides visiting some of the best beaches in the Philippines, you’ll be able to enjoy plenty of other active pursuits like surfing, scenic motorbike routes, island-hopping trips, and some diving and snorkeling.
- Starting point: the itinerary begins in Manila, but you could also start this trip in Cebu. In fact, domestic flights may be cheaper; it’s just that long-haul international flights are usually considerably cheaper if you arrive in Manila.
- Budget: this can be a budget-friendly trip to the Philippines. Although the itinerary includes domestic flights, they’re usually not expensive (as long as you book in advance). You can budget around $60–70 per day on average, though this obviously depends on the hotels you choose, activities, etc. For more information, read How much does a trip to the Philippines cost?
- Order: you can also follow this 30-day itinerary in reverse. You’ll just need to check boat and flight schedules to make sure it all lines up.
Like all our routes, this is a realistic, practical itinerary that gives you time to actually enjoy each place instead of running around like a headless chicken. Honestly, we’ve been helping travelers plan their trips since 2010, and the most common mistake we see is trying to visit too many places and ending up spending more time on buses, boats and planes than actually enjoying the destinations. Plan your route carefully, bear in mind that transfers take a long time, and remember that it gets dark by around 5:30–6:00 p.m., so the days are a bit shorter. If you follow our advice, you’ll enjoy it much more.
That said, we want to emphasize that itineraries are just a starting point. We try to strike a balance between popular destinations and places with good transport connections, but keep in mind the Philippines has more than 7,600 islands and no single island is truly essential. The key is to read the different guides on our site and pick the spots that best match your tastes and the activities you have in mind. In other words, the ideal trip will look different depending on whether you want surfing, diving, hiking, snorkeling, quieter destinations or a livelier party scene.
Philippines itinerary: 1 month
Below you’ll find a summary of the itinerary we’ve put together. You’ll find a detailed day-by-day breakdown further down, and you can click on each item to jump straight to the relevant section:
Day 1: How to get from Manila to Siargao
Days 2, 3, 4 and 5: Siargao
Day 6: How to get from Siargao to Camiguin
Days 7, 8 and 9: Camiguin
Day 10: How to get from Camiguin to Bohol
Days 11 and 12: Bohol (Anda)
Days 13 and 14: Bohol (Panglao and Loboc)
Day 15: How to get from Bohol to Siquijor
Days 16, 17 and 18: Siquijor
Day 19: How to get from Siquijor to Coron
Days 20, 21 and 22: Coron
Day 23: How to get from Coron to El Nido
Days 24, 25 and 26: El Nido
Day 27: How to get from El Nido to Port Barton
Days 28 and 29: Port Barton
Day 30: How to get from Port Barton to Manila and fly home
Travel insurance for a one-month Philippines itinerary
Whether you’re taking a long trip like this or getting away for a shorter break, it’s crucial to travel with comprehensive travel insurance. Really—don’t risk it, not only for health issues but because insurance also offers important coverage for transport cancellations or delays, repatriation, or cutting your trip short due to the hospitalization or death of a family member. In Best travel insurance for the Philippines, we tell you about the policy we’ve been using for years and, as a Travel Around the Philippines reader, you can get a 5% discount by booking through this link:

Detailed 30-day Philippines itinerary
With the practical details covered, let’s dive into this 30-day Philippines itinerary step by step. You’ll find links to plenty of detailed articles with hotel and restaurant recommendations and—most importantly—practical information about things to do. Click through to plan each part of your trip in more detail.
Day 1: Manila to Siargao
We’re starting this 30-day Philippines travel itinerary in one of our favorite corners of the country—and the world—Siargao.
Located in Mindanao in the south of the country, Siargao began to attract attention a few decades ago thanks to its waves, which put it on the radar of surfers. Although it has become much more popular in recent years and more and more travelers are visiting, Siargao still retains its magic and many travelers end up staying for weeks or even months. Whether you surf or not (we recommend trying—it’s one of the best places to surf in the Philippines), there are tons of things to do in Siargao. It’s an ideal spot for scenic motorbike routes, swimming in natural pools, exploring jaw-dropping nearby islands, and enjoying the lively nightlife… That’s why we recommend allowing plenty of time for your stay.
To get from Manila to Siargao, you’ll find all the details in How to get to Siargao. We can already tell you it’s as easy as booking a direct flight. The flight takes barely 2 hours, but direct flights are considerably more expensive than flights with a layover in Cebu, so you’ll have to weigh up the pros and cons. If you’re already in Cebu, you can also fly or travel there using a combination of ferries—you’ll find everything in the guide above.
If you’re lucky enough to land early on the island, don’t miss the chance to make the most of the day. Check out the beaches of General Luna, Malinao and Santa Fe, and watch the sunset from Cloud 9’s Boardwalk. For dinner, take a look at the best restaurants in Siargao—the island has an incredibly varied food scene.
Recommended accommodation in Siargao:
- Backpacker: Sinag Hostel
- Great value for money: Isola del Sole
- For a little luxury: Kalinaw Resort
- More options for where to stay in Siargao, hostels in Siargao and the best resorts in Siargao

Coconut Road – Magpupungko – Naked Island
Days 2, 3, 4 and 5: Siargao
We’ve dedicated 4 full days to Siargao in this 30-day Philippines itinerary. This is the minimum we consider to properly enjoy what the island offers, but of course you could stay much longer. If you want a more relaxed pace or plan to surf, we suggest extending your stay by at least a couple more days.
In our Siargao Guide you’ll find loads of info for your stay, but here’s a good way to plan your time there:
- Spend a day on your first island-hopping trip (boat trips between islands) to the three main islands—Daku, Naked and Guyam—plus Mam’on. You can read more in Island hopping in Siargao.
- Spend a day exploring by motorbike or tricycle: Magpupungko, Alegria, Tak Tak Falls and other Siargao beaches. We’ve even put together a suggested route and map in Things to do in Siargao.
- Excursion to Sugba Lagoon, Kawhagan and Pamomoan from Del Carmen.
- Spend a day island hopping around Sohoton or Corregidor Island, or spend the day surfing. You could also just relax on the beaches or do whatever else you fancy—there’s no shortage of plans!

Mamom Island
Day 6: Siargao – Camiguin
A long travel day awaits you today on this 30-day Philippines route: we’re going from Siargao to Camiguin. In our guide How to get from Siargao to Camiguin you’ll find all the details you need, but, in short, you have two options:
- Take a flight from Siargao to Camiguin. This route involves a connection in Cebu. It’s advisable to use the same airline to avoid headaches if the first flight is delayed or canceled.
- Travel overland and by ferry. To do this, you’ll need to leave Siargao very early and you’ll arrive in Camiguin in the mid-afternoon. You’ll need to take several ferries, buses and tricycles. The total cost is roughly 1,000 pesos.
You’ll probably arrive at your accommodation completely exhausted, so we recommend resting and recharging before the next few days of exploring.
Recommended accommodation in Camiguin:
- Backpacker: Shey’s Travellers Inn
- Great value for money: Mountain View Cottages
- For a little luxury: Balai sa Baibai
- More options for where to stay in Camiguin
Days 7, 8 and 9: Camiguin
Camiguin is one of our favorite Philippine islands and we recommend it to travelers who love the beach but also want a wider range of activities. The “Island Born of Fire” has a unique topography—it is said to have more volcanoes per square kilometer than anywhere else in the world. Here you can enjoy scenic motorbike routes, natural pools, waterfalls, great snorkeling, and nearby islands with spectacular beaches such as White Island or Mantigue.
We’ve allowed 3 full days here, but you could easily add at least a couple more. This is especially advisable if you plan to dive or hike.
For this 30-day Philippines itinerary, we recommend spending your time as follows:
- Spend a day island hopping around White Island and Mantigue Island. You’ll find more info in Island hopping in Camiguin.
- Motorbike loop: Katibawasan Falls, The Walkway to the Old Volcano, Sunken Cemetery, and Ardent Hot Springs.
- Motorbike loop: Tuasan Falls, Bura Soda Water Swimming Pool, Sto. Niño Cold Spring, Blue Lagoon, Moro Tower, and White Beach.
In our Camiguin Guide you can find information about these places and other activities such as the Hibok-Hibok trek, one of the most interesting volcanoes in the Philippines.

Mantigue Island and Camiguin in the background
Day 10: Camiguin – Anda (Bohol)
We hop over to the neighboring island of Bohol. Although it’s one of the most touristy islands in the Philippines, Bohol is huge and packed with charming places that few travelers ever reach, as most visitors tend to focus on just a handful of places. Therefore, to get off the beaten track, we suggest spending a couple of days in the Anda area, which also happens to be near Jagna, the port where boats from Camiguin arrive.
To get from Camiguin to Bohol and continue with this 1-month Philippines itinerary, as we explain in How to get to Bohol, take the SuperShuttle ferry that departs daily to Jagna. The journey takes about 4 hours and can be booked at this link. From there, take one of the vans from Jagna to Anda. The ride shouldn’t take more than 90 minutes and fares are usually under 100 pesos. You can also hire a tricycle, which will be more comfortable.
If you arrive in Anda with time to spare, spend some time at Quinale Beach, the main beach in the area. Sunsets are usually magical.
Recommended accommodation in Anda:
- Backpacker: 1peace Beach Resort
- Great value for money: Rose Apartments
- For a little luxury: Casa Amihan
- More options for where to stay in Anda

Quinale Beach in Anda
Days 11 and 12: Anda (Bohol)
Anda is one of the least-known places in Bohol but, for us, it has a special charm. Two days is plenty of time to explore the area. If you don’t mind moving at a faster pace, one day should also be enough.
Things to do in Anda? Here are a few ideas:
- Rent a motorbike (you can also hire a car with a driver—we can put you in touch with someone) and head to the Cadapdapan rice terraces and Can-Umantad Falls (one of the most beautiful waterfalls in Bohol). If you still have time, you can go to the Binabaje Hills in Alicia, Bohol. That same afternoon, you could make the most of your time by visiting one of Anda’s beaches. Our favorite is Bas Gamay.
- Visit Bohol’s most popular sinkhole, the Cabagnow Cave Pool; swim in one of the cave pools; go to Lamanok Island; go snorkeling or diving in search of turtles; or squeeze in a couple of dives (Anda is a paradise for macro-diving enthusiasts and, as we explain in snorkeling in Bohol, you have a good chance of seeing turtles).

Can-Umantad Falls-Bas Gamay Beach-Cabagnow Pool
Days 13 and 14: Other areas of Bohol
It’s time to discover other places to see in Bohol. You have 3 options:
- Focus on the Loboc area, a quieter and less touristy part of Bohol’s interior. Read more in Things to do in Loboc.
- Base yourself in Panglao, the island just off Bohol—more touristy but closer to the beaches and the Balicasag Marine Sanctuary. Read more in Things to do in Panglao.
- Combine both places as follows: go from Anda to Loboc and spend one night there. The next night, base yourself in Panglao. You could also do something we love: hire a car and driver to travel from Anda to Panglao via the Dimiao waterfalls, Loboc and the Chocolate Hills to make the most of your time. If you leave us a comment, we can put you in touch with an excellent local driver.
We go into great detail about where to base yourself on the island in Where to stay in Bohol.
For these 2 days in Bohol in your 1-month Philippines itinerary, we suggest these two activities:
- Rent a motorbike or hire a car and driver to visit the Chocolate Hills, the bamboo bridge, the zipline, the Man-made Forest, a few waterfalls in the island’s interior, the Loboc River cruise, a firefly-watching tour… We also have a contact who can take you by car from the Panglao area—whatever you prefer.
- Snorkeling trip to Balicasag or, if you’re certified, go diving in Balicasag. In the afternoon, you could head to Dumaluan Beach (one of the best beaches in Bohol) or snorkel in Napaling, where there’s a fairly large sardine run.
Recommended accommodation in Bohol:
- Backpacker in Panglao: Nautilus Hostel & Hammocks
- Great value for money in Panglao: The Three Shooting Stars
- Our top choice in Loboc: Loboc River Resort
- For a little luxury in Panglao: Bohol Beach Club
- More recommendations for where to stay in Panglao, where to stay in Loboc, hostels in Bohol and resorts in Bohol

Balicasag Marine Sanctuary
Day 15: Bohol – Siquijor
Today, you’ll travel to another stop on this 30-day Philippines itinerary: Siquijor. The island of witches, the enchanted island, the mystical island… Whatever you call it, Siquijor is a wonderfully well-rounded destination that rarely disappoints.
To get there, set off early and take the OceanJet ferry from Tagbilaran Port to Siquijor. In How to get from Bohol to Siquijor you’ll find all the information, but we can already tell you that the journey takes around two hours, giving you plenty of time to make the most of the afternoon. Spend the afternoon enjoying the beaches around San Juan and take in one of the best sunsets of your life.
Recommended accommodation in Siquijor:
- Backpacker: Fable Hostel
- Great value for money: Tropical Fun Ta Sea Rentals
- A little luxury: Coco Grove Beach Resort
- More recommendations for where to stay in Siquijor
Days 16, 17 and 18: Siquijor
We’ll devote 3 days of your 30-day Philippines trip to discovering Siquijor’s hidden gems. In Things to do in Siquijor you’ll find a list of activities on the island, but we suggest dividing your time as follows:
- Rent a motorbike and ride around the island, making sure to stop at Cambugahay Falls and Lugnason Falls, the Old Balete Tree, Salandong Beach, the beaches of Sandugan, and Lazi Church. If you’re up for it, Tulapos Marine Sanctuary is also well worth visiting.
- By motorbike, you can explore the island’s interior, book a traditional hilot massage to help you unwind, then go snorkeling at the Tubod sanctuary or chill on the hidden beaches of Kagusuan and/or Paliton.
- Day trip to Apo Island from Siquijor. This is especially recommended if you love turtles—there are loads of them!
You’ll find more details in our Siquijor Guide and Best beaches in Siquijor.

San Juan Beach in Siquijor
Day 19: Siquijor – Coron
One more day of transfers… Heads-up: today is going to be a long travel day! To get from Siquijor to Coron you have two options:
- Via Dumaguete: take a ferry from Siquijor to Dumaguete first thing in the morning and then a flight from Dumaguete to Coron (with a stop).
- Via Cebu: take a ferry from Siquijor to Cebu and then take a flight from Cebu to Coron. Depending on flight times to Coron, you might have to sleep in the city. You can find alternatives in our Where to stay in Cebu guide, but if you want to sleep near the airport, we suggest this one.
Which is best? Whichever option works best with the schedules, since flight connections depend entirely on your travel date. You’ll need to compare the options and see which works best for you. You’ll find more information in How to get to Coron, but either way, treat this as a full travel day.
Recommended accommodation:
- Backpacker: Hop Hostel
- Great value for money: Bay Area Lodge
- For a little luxury: The Funny Lion
- More recommendations for where to stay in Coron
Days 20, 21 and 22: Coron
We now begin the final part of the trip, which takes you through several of Palawan’s highlights. In Coron you’ll find epic limestone landscapes and uninhabited islands.
To continue with this 30-day Philippines itinerary, we’ve set aside 3 full days for you to enjoy Coron. In Best things to do in Coron and Island hopping in Coron you’ll find plenty of useful information, but our advice is to split the days as follows:
- Island hopping: Ultimate Tour, which will take you to the most beautiful spots on Coron Island. We HIGHLY recommend doing this as a private tour to avoid the biggest crowds. You can leave us a comment and we’ll send you the contact details for our trusted guide in Coron.
- Island hopping: Escapade Tour, which will take you to islands such as Malcapuya, Banana and Bulog Dos or Waling Waling.
- You have two options for your final day, depending on your tastes:
- Island hopping around remote islands such as North Cay, South Cay…
- A day of diving around Coron’s shipwrecks. It’s one of the best places to dive in the Philippines. If you’re not Open Water certified, you could try a Discover Scuba Diving experience.

Bulog Dos – Malcapuya – Waling Waling
Day 23: Coron – El Nido
The next step of this 30-day Philippines route is one of the country’s best-known destinations: El Nido.
How to get there? As we detail in How to get from Coron to El Nido, the best option is to take a fast boat from Coron to El Nido. Cebu Pacific now also offers flights between the two destinations, but bear in mind that they don’t operate every day. You can book flights here.
Book your tickets from Coron to El Nido here
When you arrive in El Nido and drop off your bags at your hotel, you can do several things. The most relaxing option is to head to Las Cabañas Beach, one of the best beaches in El Nido. There you can go for a swim and perhaps enjoy one of the best sunsets in the Philippines. If you arrive early enough, you might also go to Nacpan Beach and/or Duli Beach today.
Recommended accommodation in El Nido:
- Backpacker: Frendz Hostel El Nido
- Great value for money: Bulskamp Inn
- For a little luxury: Last Frontier Beach Resort
- More recommendations for where to stay in El Nido, hostels in El Nido and resorts in El Nido
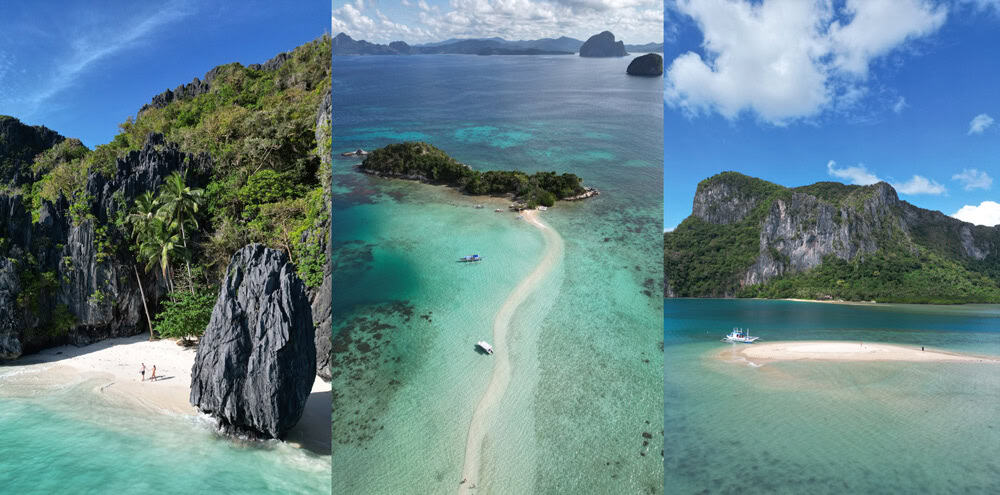
Entalula Beach-Snake Island-Sandbar
Days 24, 25 and 26: El Nido
The next few days of your 1-month Philippines travel itinerary will be devoted entirely to El Nido and the beautiful Bacuit archipelago. In Best things to do in El Nido you’ll find detailed information about the best island-hopping tours and other things to see in the area, but, to sum up, you could follow this suggested day-by-day plan:
- Island hopping A
- Spend the day exploring Nacpan, Duli, Lio and/or Las Cabañas beaches.
- Island hopping C or D; if you prefer, you can also explore the area by kayak.
You don’t have to follow this exact order, but we recommend checking the weather forecast and choosing a sunny day for the tours. Also, you already know we’re big fans of private tours and we recommend them to avoid crowds at the stops and enjoy the experience much more. In our El Nido Guide and Island Hopping in El Nido you’ll find all the info you need.
You can leave us a comment and we’ll send you the contact details for our trusted local agency in El Nido; we’ve been booking tours with them for many years.

Hidden Beach
Day 27: El Nido to Port Barton
This will be our last destination on this 1-month Philippines itinerary, and it’s a great finale. Although Port Barton doesn’t have the same jaw-dropping scenery as El Nido or Coron, you’ll find a wonderfully relaxed small-town atmosphere that will help you enjoy your final days in the Philippines even more.
How to get there? It’s all explained in detail in How to get to Port Barton, but it’s straightforward: you simply need to take a van from El Nido to Port Barton. It takes around 3.5 hours and there are only two departures a day. The best option would be to take the earliest one to make the most of the day.
Book your transfer from El Nido to Port Barton here
If you arrive at midday, you could head straight to beautiful White Beach, one of the best beaches in Port Barton (if not the very best), which you can reach on foot, by motorbike, by tricycle, or by boat. You can read all about it in our Port Barton Guide.
Recommended accommodation:
- Backpacker: CocoRico Hostel
- Great value for money in Port Barton: Sol’s Inn
- A little luxury in Port Barton: Parrots Boutique Resort
- More recommendations for where to stay in Port Barton
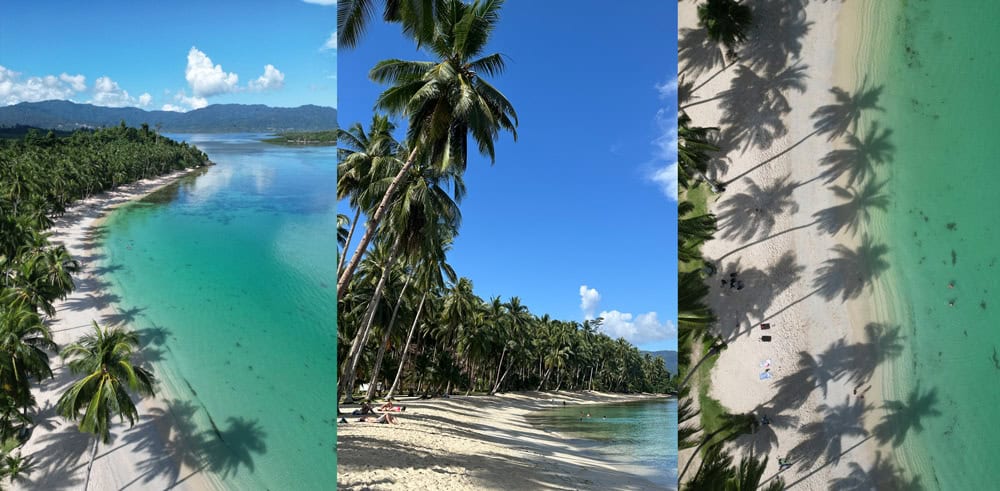
Coconut Beach – White Beach
Days 28 and 29: Port Barton
You’ll have 2 full days to relax in one of our favorite places. In our opinion, Port Barton is well worth including on a 1-month Philippines itinerary.
Much less crowded than other places on the island, Port Barton has a more laid-back, backpacker-friendly vibe. In the surrounding area, as we said, you can enjoy spectacular White Beach and affordable island-hopping trips through stunning scenery. In Things to do in Port Barton you’ll find all the information for your days there. We suggest splitting them like this:
- Take a trip to Coconut Beach, White Beach and/or Pamuayan Waterfall. You can also explore other Port Barton beaches.
- Spend a day island hopping in Port Barton and end it with an epic sunset. As always, we also have a great contact for this tour. Leave us a comment and we’ll pass it along.

Day 30: Port Barton – Manila
How you plan the final day of your Philippines itinerary will depend on when your international flight is. This will determine which flight to book from Puerto Princesa to Manila.
To get from Port Barton to Manila, first you’ll have to take one of the vans from Port Barton to Puerto Princesa. The ride takes around 3 hours and you can book a van that will drop you directly at the airport through this link. Then take your flight to Manila, but remember to allow plenty of extra time in case of unexpected delays.
If you arrive in Manila in the afternoon and your flight leaves later that night or the following day, we suggest making the most of your time with a quick tour of the city. You can go out for dinner in the lively Poblacion neighborhood and toast to a fabulous 1-month trip to the Philippines at I’M Hotel’s rooftop bar.
If you have six or seven hours to explore the capital of the Philippines, you can follow the route we propose in Things to do in Manila. Plus, as residents of the city, we have loads of restaurant tips in Best restaurants in Manila.
If your international flight departs from Cebu, the process is similar: take the van from Port Barton to Puerto Princesa and then a flight from Puerto Princesa to Cebu. There you could make the most of your time with a stroll through the historic district and see places like the Basilica del Santo Niño, Fort San Pedro and Casa Gorordo, but you have all the information you need in Best things to see in Cebu.
Recommended accommodation:
- If you need to stay overnight near Manila Airport: Savoy Hotel Manila
- If you’re spending a night in Manila and want a stylish hotel with a pool: City Garden Grand Hotel
- Backpacker in a good area in Manila: Lub-d Manila
- More options for where to stay in Manila or where to stay near Manila Airport
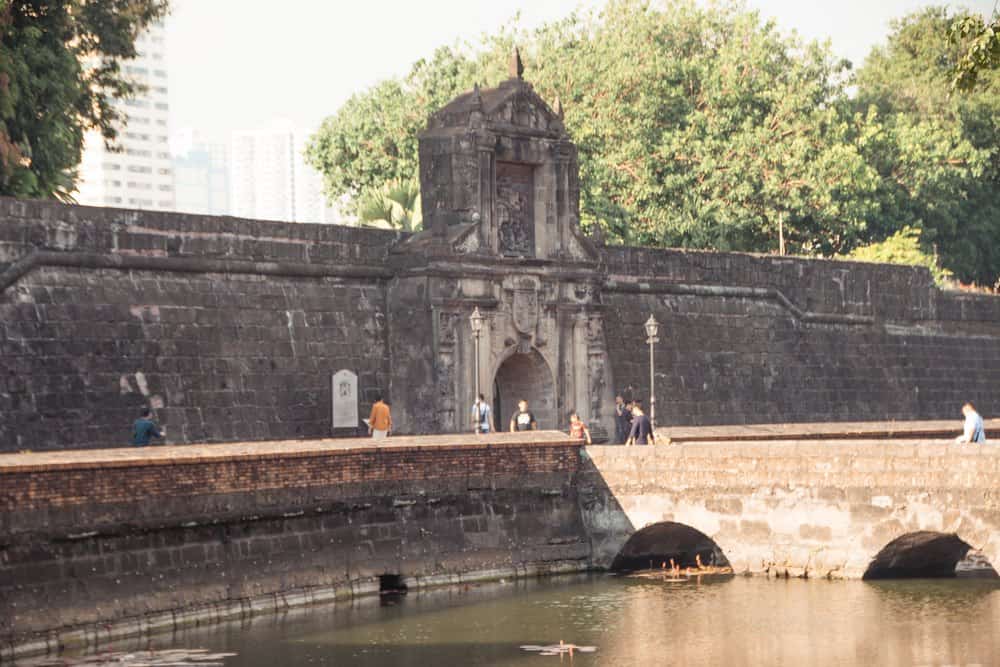
Fort Santiago in Manila
Map of the 1-month trip to the Philippines
If you’re not familiar with the geography of the Philippines, this map of our 1-month Philippines itinerary will help you see where everything is at a glance. We’ve also marked the accommodation options we recommend:
Tips to enjoy this 30-day trip to the Philippines
We’ve already shared plenty of practical advice to help your month in the Philippines go as smoothly as possible, but let us give you a few more tips:
- Best time to do this 1-month trip in the Philippines: this is an itinerary you can follow at any time of year. December, January and February aren’t the ideal months for Siargao, but if you travel during those months, that doesn’t mean you’re guaranteed rain. So we wouldn’t overthink it, especially when you have so much time. You can read much more on this topic in When to travel to the Philippines?.
- Order: as we said, you can absolutely do the route in reverse. You could even tweak parts of the itinerary if ferry and flight schedules line up better another way. In other words, you could perhaps start in Siquijor and do Siquijor–Bohol–Camiguin–Siargao–Coron–El Nido–Port Barton. What we don’t recommend is leaving Coron for the end because its airport is small and more prone to disruption. It also wouldn’t be 100% advisable to leave Siargao for last, since its airport isn’t very well equipped either.
- Consider booking private tours: seriously, it will improve your experience by 10000% in Coron and El Nido and is highly recommended in Port Barton. It can cost almost the same as a group tour if you find travel buddies and, as you know, we can also put you in touch with trusted local operators so your experience is top-notch. Just leave us a comment below.
- Travel light: you’ll be taking several domestic flights, domestic airlines in the Philippines charge for checked baggage, and the maximum carry-on allowance is 7 kg. With laundry services widely available and given the nature of this trip—where you won’t need many clothes—your best option is to travel with carry-on luggage only. You can read more about it in What to pack for the Philippines.
- You’ll find more Recommendations and tips for traveling to the Philippines and a Philippines Guide to help you plan the route even further.
- Money: one of the cheapest ways to access cash is through Remitly. We know it may seem odd at first because it’s not commonly used elsewhere, but in the Philippines it’s widely used and you’ll save a lot in fees. It’s all explained in detail in Money in the Philippines.
- Stay safe: we never tire of repeating it, but having travel insurance with reliable assistance in the Philippines is essential—especially if you’re coming for a month. Unfortunately, we’ve had plenty of experience making insurance claims in the Philippines and we can “proudly” say we’ve never had to cover our medical bills ourselves. You can get a 5% discount here on the best travel insurance for the Philippines.

Alternatives to this 1-month Philippines itinerary
Every traveler is different, so in a month in the Philippines you could do something very different. To make things even easier, here are a few alternative routes to consider:
1. Add the Coron to El Nido expedition
You may have heard about the Coron to El Nido expedition (or vice versa) because it’s increasingly popular and almost everyone who does it loves it. It’s a 3- or 4-day tour exploring the islands between the two destinations, sleeping on remote islands, snorkeling and, ultimately, enjoying a completely different kind of adventure.
One thing to keep in mind is that expeditions don’t include any of the El Nido or Coron tours—only a few stops from Coron’s Escapade Tour (not the Ultimate). For this reason, we don’t think it’s advisable to remove Coron and El Nido from the itinerary entirely and replace them with the expedition. However, you could skip 1 day in Siargao, 1 day in Coron and 1 day in El Nido and follow an itinerary along these lines:
- Day 1: Transfer Manila–Siargao
- Days 2, 3 and 4: Siargao
- Day 5: Transfer Siargao–Camiguin
- Days 6, 7 and 8: Camiguin
- Day 9: Transfer to Anda (Bohol)
- Days 10 and 11: Anda
- Days 12 and 13: Panglao/Loboc
- Day 14: Transfer Bohol–Siquijor
- Days 15, 16 and 17: Siquijor
- Day 18: Transfer Siquijor–Coron
- Days 19 and 20: Coron
- Days 21, 22, 23 and 24: expedition
- Days 25 and 26: El Nido
- Day 27: Transfer from El Nido to Port Barton
- Days 28 and 29: Port Barton
- Day 30: Transfer to Manila
You could also cut 1 day in Port Barton and add 1 more in Siargao. Same with Siquijor. There are plenty of possibilities; it all depends on how you want to readjust it.
As we said, you can do 4-day/3-night expeditions (the option we recommend) and you can book it HERE. Book through our link and use the code FACEBOOK10 to get 10% off. If you prefer to stick to the 3-day/2-night one, we recommend THIS COMPANY. With the code TRAVELPHILIPPINES you get 1,000 pesos off per person.

2. Remove Camiguin or Siargao and replace it with Malapascua or Bantayan
If beaches or diving are your top priorities and you want some time to relax, you could skip Camiguin or Siargao and start your trip by flying to Cebu. From there, you can travel to either Malapascua or Bantayan. The former is better known as a paradise for divers, but it also has beaches and an atmosphere we love. In Things to do in Malapascua and Diving in Malapascua you can learn more.
Bantayan, meanwhile, has idyllic beaches and is the perfect place to recover from jet lag at the start of your trip. In Things to do in Bantayan you can get an idea of what you’ll find there.
Then you could simply continue the route by returning to Cebu and connecting with any of the following destinations: Camiguin, Siargao, Siquijor or Bohol. All are accessible from Cebu. In each destination guide, you’ll find all the information you need in the “How to get there” section to keep building your route.
3. Replace Coron with Malapascua or Bantayan
If you feel you’ve seen enough of Palawan with El Nido and Port Barton—since Coron has scenery similar to El Nido—a good option would be to travel from Siquijor to Malapascua or Bantayan and finish your 30-day Philippines itinerary in El Nido.
If you’re a diver, we don’t recommend skipping Coron because we think the WWII wreck diving there is incredible.

Malapascua
4. Remove the Anda part and visit Moalboal
If you’re keen on doing a lot of snorkeling, from Camiguin you can go straight to Panglao, spend 2–3 days there, go to Siquijor and then head to Moalboal before continuing to Palawan. You’ll find all the information in Things to do in Moalboal, but we can already tell you it’s famous for its huge sardine run and snorkeling with turtles. Plus, it also gives you the chance to go canyoneering at Kawasan Falls, which is quite unique.
5. Relax over 30 days in the Philippines
It may sound obvious, but if you want an even more relaxed itinerary, you could skip some destinations. For example, you could replace Coron with a few more days in Siargao. You could also skip Anda and spend more time in Siquijor. As you can see, everything can be tailored to suit your own interests.
6. Off the beaten track!
If you want something different, remove Palawan from your trip and spend those days exploring the Romblon region: Romblon, Sibuyan and Cresta de Gallo. Getting there will be a bit tricky, since you’ll have to fly from Cebu to Roxas or Caticlan (see How to get to Romblon), but the region may be one of the highlights of your trip—especially if you want to venture beyond the Philippines’ most popular destinations.
You can also skip Coron Town and head straight to Concepcion. This area of Busuanga is perfect for those who want to explore a different part of Busuanga without missing out on the spectacular Ultimate Tour.

Cresta de Gallo
Frequently asked questions about the 1-month Philippines route
We’ll finish by answering the questions we’re asked most often by travelers who want to come to the Philippines for a month:
What is the best 1-month route through the Philippines?
The best route is the one that suits your interests and the activities you want to do. To find the right one, it’s important to do your research, since the Philippines has more than 7,600 islands and no single island is essential. That said, we’ve designed a very varied route that includes Siargao, Camiguin, Bohol (Anda, Loboc and Panglao areas), Siquijor, Coron, El Nido and Port Barton.
How much does 1 month in the Philippines cost?
It depends a lot on the season, the type of accommodation you choose, the activities you do (diving is expensive), etc. Even so, you could budget around $60–70 per day.
Can I stay in the Philippines for a month?
It depends on your nationality. That said, most people can stay in the Philippines without a visa for 30 days. If you want to remain longer, you can apply for a visa at a Philippine consulate or embassy before traveling or extend your stay here online, at the airport, or by going to an immigration office. You can stay in the Philippines without leaving for up to 3 years.
How long should you spend in the Philippines?
In our opinion, a good amount of time—and enough to make the long journey worthwhile—is 20 days. If you have a month to explore the Philippines, even better.
What can you do in the Philippines in 30 days?
You could do lots of things, but the destinations we recommend for a trip of this length are Siargao, Camiguin, Bohol (Anda, Loboc and Panglao areas), Siquijor, Coron, El Nido and Port Barton.
Did you find this 1-month DIY Philippines itinerary helpful? Any questions? Tell us in the comments!
You’ll find many more routes on our Philippines travel itineraries page.